自定义实体生物状态HUD
什么是实体��生物状态HUD?
实体生物状态HUD 用来在一系列设置,通过添加额外的HUD,来更加直观的展示实体生物的名字、生命等等的状态
自定义实体生物状态HUD-Dos版演示教程
点击查看完整的示例配置文件
entity_state:
  options:
    startX: "0"
    startY: "0"
    openDos:
      - "refreshPlaceholder`<->`cursorEntity_exist"
      - "refreshPlaceholder`<->`cursorEntity_name"
      - "refreshPlaceholder`<->`cursorEntity_health"
      - "refreshPlaceholder`<->`cursorEntity_max_health"
      - "update`<->`health@width@w*0.172*%cursorEntity_health%/%cursorEntity_max_health%"
      - "update`<->`health@endU@108*%cursorEntity_health%/%cursorEntity_max_health%"
      - "delay`<->`100"
      - "goto`<->`1"
  background:
    enable: exist(%cursorEntity_exist%,true)
    type: texture
    path: 'local`<->`textures/gui/custom_entity_state.png'
    locationX: "0"
    locationY: "0"
    locationZ: "0"
    width: "w*0.258"
    height: "h*0.153"
  health:
    enable: exist(%cursorEntity_exist%,true)
    type: texture
    path: 'local`<->`textures/gui/entity_health.png'
    locationX: "w*0.080"
    locationY: "h*0.083"
    locationZ: "1"
    width: "w*0.172"
    height: "h*0.049"
    startU: "0"
    startV: "0"
    endU: "0"
    endV: "16"
  cursor_entity:
    enable: exist(%cursorEntity_exist%,true)
    type: entity
    model: 'cursor'
    followCursor: false
    lookAtX: "w*0.039"
    lookAtY: "h*0.092"
    size: "28"
    locationX: "w*0.04"
    locationY: "h*0.126"
    locationZ: "1"
  cursor_entity_name:
    enable: exist(%cursorEntity_exist%,true)
    type: label
    align: "center"
    scale: '2'
    font: "default"
    texts:
      - "%cursorEntity_name%"
    locationX: "w*0.165"
    locationY: "h*0.028"
    locationZ: "1"
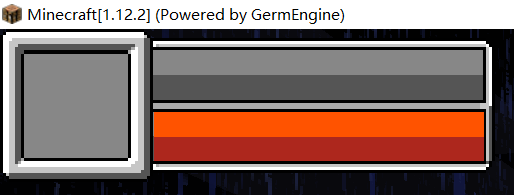
第一步,配置实体生物状态HUD的背景图片
首先,制作好合适的背景图片,这里以custom_entity_state.png为例

我们在plugins/GermPlugin/gui文件夹内创建一个yml文件,这里以entity_state.yml为例
entity_state:
  options:
    startX: "0"
    startY: "0"
  background:
    enable: true
    type: texture
    path: 'local`<->`textures/gui/custom_entity_state.png'
    locationX: "0"
    locationY: "0"
    locationZ: "0"
    width: "w*0.258"
    height: "h*0.153"
接下来,我们在Config.yml里进行如下配置,然后再次进入游戏即可
#在玩家加入服务器时,赋予玩家这些HUD
PermanentHud:
  - "entity_state"

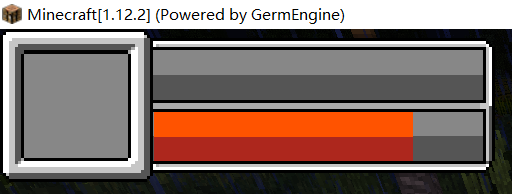
第二步,配置自右向左切割的实体生物状态HUD
这里我们以实体生物血量条为例,配置一个自右向左切割的状态条,首先准备好图片,这里以entity_health.png为例
![]()
我们在entity_state.yml里创建如下配置
entity_state:
  options:
    startX: "0"
    startY: "0"
  background:
    enable: true
    type: texture
    path: 'local`<->`textures/gui/custom_entity_state.png'
    locationX: "0"
    locationY: "0"
    locationZ: "0"
    width: "w*0.258"
    height: "h*0.153"
  health:
    enable: true
    type: texture
    path: 'local`<->`textures/gui/entity_health.png'
    locationX: "w*0.080"
    locationY: "h*0.083"
    locationZ: "1"
    width: "w*0.172"
    height: "h*0.049"
    startU: "0"
    startV: "0"
    endU: "108"
    endV: "16"
那我们如何使它从右向左动起来呢,我们在entity_state.yml的options里添加如下的openDos
    openDos:
      #刷新变量%cursorEntity_health%(十字准星目标血量变量)
      - "refreshPlaceholder`<->`cursorEntity_health"
      #刷新变量%cursorEntity_health%(十字准星目标最大血量变量)
      - "refreshPlaceholder`<->`cursorEntity_max_health"
      #更新entity_state.yml内,名为health的组件的width为w*0.172*%player_food_level%/20
      #即更新名为health的组件的图片宽度为【满状态图片宽度*当前状态变量/满状态变量】
      - "update`<->`health@width@w*0.172*%cursorEntity_health%/%cursorEntity_max_health%"
      #更新entity_state.yml内,名为health的组件的endU为84*%player_food_level%/20
      #即更新名为health的组件的图片的右侧截取界限为【图片的真实像素宽度*当前状态变量/满状态变量】
      - "update`<->`health@endU@108*%cursorEntity_health%/%cursorEntity_max_health%"
      #延迟100ms再向下执行
      - "delay`<->`100"
      #返回openDos的第一行
      - "goto`<->`1"
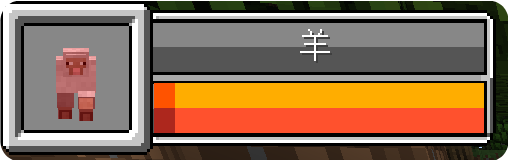
现在再进入游戏,实体生物血量条已经开始随着你的十字准星所瞄准的目标的血量的变化而从右向左变化了!!
第三步,配置实体生物名称与模型
我们先在entity_state.yml的openDos里写上
    openDos:
      #刷新变量%cursorEntity_name%(十字准星目标名称变量)
      - "refreshPlaceholder`<->`cursorEntity_name"
我们继续在entity_state.yml里创建如下配置
entity_state:
  options:
    startX: "0"
    startY: "0"
    openDos:
      - "refreshPlaceholder`<->`cursorEntity_name"
      - "refreshPlaceholder`<->`cursorEntity_health"
      - "refreshPlaceholder`<->`cursorEntity_max_health"
      - "update`<->`health@width@w*0.172*%cursorEntity_health%/%cursorEntity_max_health%"
      - "update`<->`health@endU@108*%cursorEntity_health%/%cursorEntity_max_health%"
      - "delay`<->`100"
      - "goto`<->`1"
  background:
    enable: true
    type: texture
    path: 'local`<->`textures/gui/custom_entity_state.png'
    locationX: "0"
    locationY: "0"
    locationZ: "0"
    width: "w*0.258"
    height: "h*0.153"
  health:
    enable: true
    type: texture
    path: 'local`<->`textures/gui/entity_health.png'
    locationX: "w*0.080"
    locationY: "h*0.083"
    locationZ: "1"
    width: "w*0.172"
    height: "h*0.049"
    startU: "0"
    startV: "0"
    endU: "108"
    endV: "16"
  cursor_entity:
    enable: true
    type: entity
    model: 'cursor'
    followCursor: false
    lookAtX: "w*0.039"
    lookAtY: "h*0.092"
    size: "28"
    locationX: "w*0.04"
    locationY: "h*0.126"
    locationZ: "1"
  cursor_entity_name:
    enable: true
    type: label
    align: "center"
    scale: '2'
    font: "default"
    texts:
      - "%cursorEntity_name%"
    locationX: "w*0.165"
    locationY: "h*0.028"
    locationZ: "1"
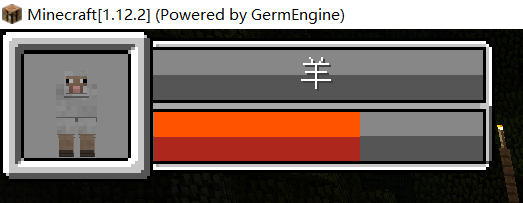
第四步,配置实体生物状态HUD的自动开关
当我们面前没有实体生物时,这样一个东西挡在左上角可能会显得很突兀,这时候我们可以对它进行配置,使其自动开关!
我们先在entity_state.yml的openDos里写上
    openDos:
      #刷新变量%cursorEntity_exist%(十字准星目标是否存在变量)
      - "refreshPlaceholder`<->`cursorEntity_exist"
然后,我们对在entity_state.yml里的每个组件的enable属性进行修改,改为如下样式
enable: exist(%cursorEntity_exist%,true)
此时,再进入游戏,实体生物状态条的自动开关就已经完成了!
自定义实体生物状态HUD-脚本版演示教程
点击查看完整的示例配置文件
script_entity_state:
options:
startX: "0"
startY: "0"
script:
tickScript: |
var delayConunt = tickCount % 2 ;
if(delayConunt != 0){
return 0;
}
if(PAPI.request("%cursorEntity_exist%").equals("true")){
for(var guiPart : GuiScreen.getGuiParts()){
guiPart.setEnable(true);
}
var cursor_health = double(PAPI.request("%cursorEntity_health%"));
var cursor_max_health = double(PAPI.request("%cursorEntity_max_health%"));
var health_rate = cursor_health/cursor_max_health;
var health_texture = GuiScreen.getGuiPart("health");
health_texture.setWidth(165*health_rate);
health_texture.setEndU(108*health_rate);
var health_shiny_texture = GuiScreen.getGuiPart("health_shiny");
if(health_texture.getWidth() != health_shiny_texture.getWidth()){
var run = ()=>{
health_shiny_texture.setWidth(165*health_rate);
health_shiny_texture.setEndU(108*health_rate);
};
Utils.getScheduler().runTaskLater(JexlContext, run, 20);
}
}else{
for(var guiPart : GuiScreen.getGuiParts()){
guiPart.setEnable(false);
}
}
background:
type: texture
path: 'local`<->`textures/gui/custom_entity_state.png'
locationX: "0"
locationY: "0"
locationZ: "0"
width: "248"
height: "77"
health_shiny:
type: texture
path: 'local`<->`textures/gui/entity_health_shiny.png'
locationX: "77"
locationY: "41"
locationZ: "1"
width: "165"
height: "25"
startU: "0"
startV: "0"
endU: "108"
endV: "16"
health:
type: texture
path: 'local`<->`textures/gui/entity_health.png'
locationX: "77"
locationY: "41"
locationZ: "3"
width: "165"
height: "25"
startU: "0"
startV: "0"
endU: "108"
endV: "16"
cursor_entity:
type: entity
model: 'cursor'
followCursor: false
lookAtX: "38"
lookAtY: "46"
size: "28"
locationX: "38"
locationY: "63"
locationZ: "1"
cursor_entity_name:
type: label
align: "center"
scale: '2'
font: "default"
texts:
- "%cursorEntity_name%"
locationX: "158"
locationY: "14"
locationZ: "1"
`
---
### 第一步,配置实体生物状态HUD的背景图片
首先,制作好合适的背景图片,这里以`custom_entity_state.png`为例

我们在`plugins/GermPlugin/gui`文件夹内创建一个**yml文件**,这里以`entity_state.yml`为例
```yaml
script_entity_state:
options:
startX: "0"
startY: "0"
background:
type: texture
path: 'local`<->`textures/gui/custom_entity_state.png'
locationX: "0"
locationY: "0"
locationZ: "0"
width: "248"
height: "77"
接下来,我们在Config.yml里进行如下配置,然后再次进入游戏即可
#在玩家加入服务器时,赋予玩家这些HUD
PermanentHud:
  - "script_entity_state"
第二步,配置自右向左切割的实体生物状态HUD
这里我们以实体生物血量条为例,配置一个自右向左切割的状态条,首先准备好图片,这里以entity_health.png为例
![]()
我们在entity_state.yml里创建如下配置
entity_state:
  options:
    startX: "0"
    startY: "0"
  background:
    type: texture
    path: 'local`<->`textures/gui/custom_entity_state.png'
    locationX: "0"
    locationY: "0"
    locationZ: "0"
    width: "248"
    height: "77"
  // 血量条图片
  health:
    type: texture
    path: 'local`<->`textures/gui/entity_health.png'
    locationX: "77"
    locationY: "41"
    locationZ: "3"
    width: "165"
    height: "25"
    startU: "0"
    startV: "0"
    endU: "108"
    endV: "16"
那我们如何使它从右向左动起来呢,我们在entity_state.yml的options里添加如下的脚本
    script:
      tickScript: |
        // 对tickCount按2取余,这样就能结合判断做到每2tick执行一次运行逻辑
        var delayConunt = tickCount % 2 ;
        if(delayConunt != 0){
          return 0;
        }
        // 以下为血量条运行逻辑
        // 获取%cursorEntity_health%占位符的解析值(String),并转换为double类型
        var cursor_health = double(PAPI.request("%cursorEntity_health%"));
        // 获取%cursorEntity_max_health%占位符的解析值(String),并转换为double类型
        var cursor_max_health = double(PAPI.request("%cursorEntity_max_health%"));
        // 计算出生命值百分比
        var health_rate = cursor_health/cursor_max_health;
        // 获取生命值对应的图片组件
        var health_texture = GuiScreen.getGuiPart("health");
        // 设置health组件的width为 "165*health_rate的值
        // 即更新名为health的组件的图片宽度为【满状态图片宽度*当前状态值/满状态值】
        health_texture.setWidth(165*health_rate);
        // 设置health组件的endU为 108*health_rate的值
        // 即更新名为health的组件的图片的右方截取界限为【图片的真实像素宽度*当前状态值/满状态值】
        health_texture.setEndU(108*health_rate);
现在再进入游戏,实体生物血量条已经开始随着你的十字准星所瞄准的目标的血量的变化而从右向左变化了!!
第三步,配置实体生物名称与模型
我们继续在entity_state.yml里创建如下配置
script_entity_state:
  options:
    startX: "0"
    startY: "0"
    script:
      tickScript: |
        var delayConunt = tickCount % 2 ;
        if(delayConunt != 0){
          return 0;
        }
        var cursor_health = double(PAPI.request("%cursorEntity_health%"));
        var cursor_max_health = double(PAPI.request("%cursorEntity_max_health%"));
        var health_rate = cursor_health/cursor_max_health;
        var health_texture = GuiScreen.getGuiPart("health");
        health_texture.setWidth(165*health_rate);
        health_texture.setEndU(108*health_rate);
  background:
    type: texture
    path: 'local`<->`textures/gui/custom_entity_state.png'
    locationX: "0"
    locationY: "0"
    locationZ: "0"
    width: "248"
    height: "77"
  health:
    type: texture
    path: 'local`<->`textures/gui/entity_health.png'
    locationX: "77"
    locationY: "41"
    locationZ: "3"
    width: "165"
    height: "25"
    startU: "0"
    startV: "0"
    endU: "108"
    endV: "16"
  // 实体生物显示
  cursor_entity:
    type: entity
    model: 'cursor'
    followCursor: false
    lookAtX: "38"
    lookAtY: "46"
    size: "28"
    locationX: "38"
    locationY: "63"
    locationZ: "1"
  // 实体生物名称
  cursor_entity_name:
    type: label
    align: "center"
    scale: '2'
    font: "default"
    texts:
      - "%cursorEntity_name%"
    locationX: "158"
    locationY: "14"
    locationZ: "1"
第四步,配置实体生物状态HUD的自动开关
当我们面前没有实体生物时,这样一个东西挡在左上角可能会显得很突兀,这时候我们可以对它进行配置,使其自动开关!
这时我们对entity_state.yml的tickScript进行修改
    script:
      tickScript: |
        var delayConunt = tickCount % 2 ;
        if(delayConunt != 0){
          return 0;
        }
        // 获取%cursorEntity_exist%占位符的解析值(String)
        // 若解析值等于"true"则代表目前玩家面前有实体生物
        if(PAPI.request("%cursorEntity_exist%").equals("true")){
          // 遍历界面内所有组件
          for(var guiPart : GuiScreen.getGuiParts()){
            // 将该组件的enable属性设置为true
            guiPart.setEnable(true);
          }
          var cursor_health = double(PAPI.request("%cursorEntity_health%"));
          var cursor_max_health = double(PAPI.request("%cursorEntity_max_health%"));
          var health_rate = cursor_health/cursor_max_health;
          var health_texture = GuiScreen.getGuiPart("health");
          health_texture.setWidth(165*health_rate);
          health_texture.setEndU(108*health_rate);
        }else{
          // 下面是if判断条件不通过的情况
          // 即代表玩家面前没有任何实体生物
          // 遍历界面内所有组件
          for(var guiPart : GuiScreen.getGuiParts()){
            // 将该组件的enable属性设置为false
            guiPart.setEnable(false);
          }
        }
此时,再进入游戏,实体生物状态条的自动开关就已经完成了!
第五步,为实体生物状态HUD的的血量条增加简单的动态效果
首先准备好图片,这里以entity_health_shiny.png为例
![]() 我们继续在
我们继续在entity_state.yml里进行如下配置修改
script_entity_state:
  options:
    startX: "0"
    startY: "0"
    script:
      tickScript: |
        var delayConunt = tickCount % 2 ;
        if(delayConunt != 0){
          return 0;
        }
        if(PAPI.request("%cursorEntity_exist%").equals("true")){
          for(var guiPart : GuiScreen.getGuiParts()){
            guiPart.setEnable(true);
          }
          var cursor_health = double(PAPI.request("%cursorEntity_health%"));
          var cursor_max_health = double(PAPI.request("%cursorEntity_max_health%"));
          var health_rate = cursor_health/cursor_max_health;
          var health_texture = GuiScreen.getGuiPart("health");
          health_texture.setWidth(165*health_rate);
          health_texture.setEndU(108*health_rate);
        }else{
          for(var guiPart : GuiScreen.getGuiParts()){
            guiPart.setEnable(false);
          }
        }
  background:
    type: texture
    path: 'local`<->`textures/gui/custom_entity_state.png'
    locationX: "0"
    locationY: "0"
    locationZ: "0"
    width: "248"
    height: "77"
  // 血量背景闪烁条
  health_shiny:
    type: texture
    path: 'local`<->`textures/gui/entity_health_shiny.png'
    locationX: "77"
    locationY: "41"
    locationZ: "1"
    width: "165"
    height: "25"
    startU: "0"
    startV: "0"
    // 最大值为health的108 默认设置0
    endU: "0"
    endV: "16"
  health:
    type: texture
    path: 'local`<->`textures/gui/entity_health.png'
    locationX: "77"
    locationY: "41"
    locationZ: "3"
    width: "165"
    height: "25"
    startU: "0"
    startV: "0"
    endU: "108"
    endV: "16"
  cursor_entity:
    type: entity
    model: 'cursor'
    followCursor: false
    lookAtX: "38"
    lookAtY: "46"
    size: "28"
    locationX: "38"
    locationY: "63"
    locationZ: "1"
  cursor_entity_name:
    type: label
    align: "center"
    scale: '2'
    font: "default"
    texts:
      - "%cursorEntity_name%"
    locationX: "158"
    locationY: "14"
    locationZ: "1"
并为其添加如下脚本,做出简单的动态效果~
    script:
      tickScript: |
        var delayConunt = tickCount % 2 ;
        if(delayConunt != 0){
          return 0;
        }
        if(PAPI.request("%cursorEntity_exist%").equals("true")){
          for(var guiPart : GuiScreen.getGuiParts()){
            guiPart.setEnable(true);
          }
          var cursor_health = double(PAPI.request("%cursorEntity_health%"));
          var cursor_max_health = double(PAPI.request("%cursorEntity_max_health%"));
          var health_rate = cursor_health/cursor_max_health;
          var health_texture = GuiScreen.getGuiPart("health");
          health_texture.setWidth(165*health_rate);
          health_texture.setEndU(108*health_rate);
          // 获取当前界面内名为health_shiny的组件
          var health_shiny_texture = GuiScreen.getGuiPart("health_shiny");
          // 判断 health组件的宽度是否不等于health_shiny组件的宽度
          if(health_texture.getWidth() != health_shiny_texture.getWidth()){
            // 如果不等于运行如下逻辑
            // 创建函数作为调度器的运行任务
            var run = ()=>{
              // 设置health_shiny组件的width为 165*health_rate
              // 即同步health组件的width
              health_shiny_texture.setWidth(165*health_rate);
              // 设置health_shiny组件的endU为 108*health_rate
              // 即同步health组件的endU
              health_shiny_texture.setEndU(108*health_rate);
            };
            // 提交run给脚本调度器
            // runTaskLater代表在主线程中延时指定tick后运行任务
            // 这里我们设置延时为20ticks
            // 这就代表会在20ticks后在主线程内运行一次run这个函数
            Utils.getScheduler().runTaskLater(JexlContext, run, 20);
          }
        }else{
          for(var guiPart : GuiScreen.getGuiParts()){
            guiPart.setEnable(false);
          }
        }
此时,再进入游戏,攻击实体生物,一个简单的状态条动态效果的就已经完成了!