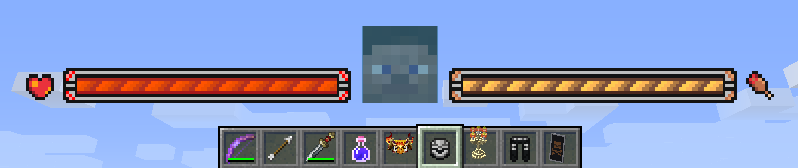
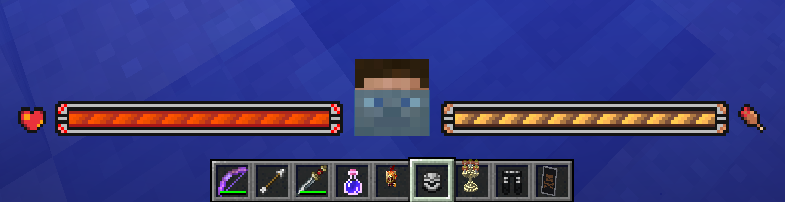
自定义玩家状态HUD
什么是玩家状态HUD?
玩家状态HUD 用来在一系列设置,通过添加额外的HUD,来更加直观的展示玩家的生命、饥饿和经验条等等的状态
自定义玩家状态HUD-Dos版演示教程
示例配置文件
点击查看完整的示例配置文件
player_state:
  options:
    startX: "w*0.5"
    startY: "h"
    startZ: "0"
    openDos:
      - "refreshPlaceholder`<->`player_food_level"
      - "update`<->`hunger@width@w*0.135*%player_food_level%/20"
      - "update`<->`hunger@endU@84*%player_food_level%/20"
      - "refreshPlaceholder`<->`ap_life"
      - "refreshPlaceholder`<->`ap_lifes"
      - "update`<->`heart@width@w*0.135*%ap_life%/%ap_lifes%"
      - "update`<->`heart@startU@84-84*%ap_life%/%ap_lifes%"
      - "update`<->`heart@locationX@w*-0.168+(w*0.135-w*0.135*%ap_life%/%ap_lifes%)"
      - "refreshPlaceholder`<->`player_air"
      - "update`<->`oxygen@height@h*0.077*%player_air%/300"
      - "update`<->`oxygen@startV@24-24*%player_air%/300"
      - "update`<->`oxygen@locationY@h*-0.144+(h*0.077-h*0.077*%player_air%/300)"
      - "delay`<->`100"
      - "goto`<->`1"
  background:
    type: texture
    path: 'local`<->`textures/gui/custom_bar.png'
    locationX: "-w*0.225"
    locationY: "-h*0.150"
    locationZ: "0"
    width: "w*0.45"
    height: "h*0.09"
    startV: "0"
  hunger:
    type: texture
    path: 'local`<->`textures/gui/hunger.png'
    locationX: "w*0.033"
    locationY: "-h*0.092"
    locationZ: "1"
    width: "w*0.135"
    height: "h*0.016"
    startU: "0"
    startV: "0"
    endU: "84"
    endV: "5"
  heart:
    type: texture
    path: 'local`<->`textures/gui/heart.png'
    locationX: "-w*0.168"
    locationY: "-h*0.092"
    locationZ: "1"
    width: "w*0.135"
    height: "h*0.016"
    startU: "0"
    startV: "0"
    endU: "84"
    endV: "5"
  oxygen:
    enable: exist(%player_inWater%,true)
    type: texture
    path: 'local`<->`textures/gui/oxygen.png'
    locationX: "-w*0.020"
    locationY: "-h*0.144"
    locationZ: "1"
    width: "w*0.040"
    height: "h*0.077"
    startU: "0"
    startV: "0"
    endU: "24"
    endV: "24"
第一步,关闭原版状态条
在原版游戏中,游戏提供了显示玩家的生命、饥饿和经验条等等的状态的原版状态条,你需要将其关闭,在进行自定义更改。
在配置Config.yml中有如下内容,改写为true即可
  #关于游戏内HUD的参数设置
  HUD:
    # 取消显示原版的血量条
    disableHealth: true
    # 取消显示原版的经验条
    disableExperience: true
    # 取消显示原版的饥饿条
    disableFood: true
    # 取消显示原版的快捷栏
    disableQuick: true
    # 取消显示原版的盔甲栏
    disableArmor: true
    # 取消显示原版的骑马跳跃条
    disableJump: true
    # 取消显示原版的TAB列表
    disableTab: true
    # 取消显示原版的聊天框
    disableChat: true
    # 取消显示原版的药水显示
    disablePotion: true
    # 取消显示原版的水下氧气显示
    disableAir: true
    # 取消显示原版的骑马时马的血量
    disableHealthMount: true
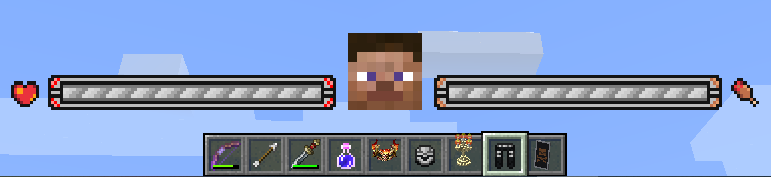
第二步,配置自定义玩家状态HUD的背景图片
首先,制作好合适的背景图片,这里以![]() 为例
为例
我们在plugins/GermPlugin/gui文件夹内创建一个yml文件,这里以player_state.yml为例
player_state:
  options:
    startX: "w*0.5"
    startY: "h"
    startZ: "0"
  #HUD的背景图片
  background:
    type: texture
    path: 'local`<->`textures/gui/custom_player_state.png'
    locationX: "-w*0.225"
    locationY: "-h*0.150"
    locationZ: "0"
    width: "w*0.45"
    height: "h*0.09"
接下来,我们在Config.yml里进行如下配置,然后再次进入游戏即可
#在玩家加入服务器时,赋予玩家这些HUD
PermanentHud:
  - "player_state"
第三步,配置自右向左切割的状态条
这里我们以饥饿条为例,配置一个自右向左切割的状态条,首先准备好图片,这里以hunger.png为例
![]()
我们在player_state.yml里创建如下配置
player_state:
  options:
    startX: "w*0.5"
    startY: "h"
    startZ: "0"
  background:
    type: texture
    path: 'local`<->`textures/gui/custom_player_state.png'
    locationX: "-w*0.225"
    locationY: "-h*0.150"
    locationZ: "0"
    width: "w*0.45"
    height: "h*0.09"
  #饥饿条图片
  hunger:
    type: texture
    path: 'local`<->`textures/gui/hunger.png'
    locationX: "w*0.033"
    locationY: "-h*0.092"
    locationZ: "1"
    width: "w*0.135"
    height: "h*0.016"
    #填写0即可
    startU: "0"
    #填写0即可
    startV: "0"
    #填写图片的真实像素宽度
    endU: "84"
    #填写图片的真实像素高度
    endV: "5"
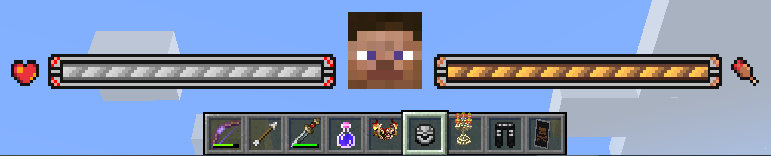
那我们如何使它从右向左动起来呢?我们在player_state.yml的options里添加如下的openDos配置
    openDos:
      #刷新变量%player_food_level%(原版饥饿度变量)
      - "refreshPlaceholder`<->`player_food_level"
      #更新player_state.yml内,名为hunger的组件的width为w*0.135*%player_food_level%/20
      #即更新名为hunger的组件的图片宽度为【满状态图片宽度*当前状态变量/满状态变量】
      #因为原版饥饿度的最大值固定为20,所以我们填写为 %player_food_level%/20
      - "update`<->`hunger@width@w*0.135*%player_food_level%/20"
      #更新player_state.yml内,名为hunger的组件的endU为84*%player_food_level%/20
      #即更新名为hunger的组件的图片的右方截取界限为【图片的真实像素宽度*当前状态变量/满状态变量】
      - "update`<->`hunger@endU@84*%player_food_level%/20"
      #延迟100ms再向下执行
      - "delay`<->`100"
      #返回openDos的第一行
      - "goto`<->`1"
现在再进入游戏,饥饿条已经开始随着你的饥饿度的变化而从右向左变化了!!

第四步,配置自左向右切割的状态条
这里我们以血量条为例,配置一个自左向右切割的状态条,首先准备好图片,这里以heart.png为例
![]()
我们继续在player_state.yml里创建如下配置
player_state:
  options:
    startX: "w*0.5"
    startY: "h"
    startZ: "0"
    openDos:
      - "refreshPlaceholder`<->`player_food_level"
      - "update`<->`hunger@width@w*0.135/20*%player_food_level%"
      - "update`<->`hunger@endU@84/20*%player_food_level%"
      - "delay`<->`100"
      - "goto`<->`1"
  background:
    type: texture
    path: 'local`<->`textures/gui/custom_bar.png'
    locationX: "-w*0.225"
    locationY: "-h*0.150"
    locationZ: "0"
    width: "w*0.45"
    height: "h*0.09"
  hunger:
    type: texture
    path: 'local`<->`textures/gui/hunger.png'
    locationX: "w*0.033"
    locationY: "-h*0.092"
    locationZ: "1"
    width: "w*0.135"
    height: "h*0.016"
    startU: "0"
    startV: "0"
    endU: "84"
    endV: "5"
  #血量条图片
  heart:
    type: texture
    path: 'local`<->`textures/gui/heart.png'
    locationX: "-w*0.168"
    locationY: "-h*0.092"
    locationZ: "1"
    width: "w*0.135"
    height: "h*0.016"
    #填写0即可
    startU: "0"
    #填写0即可
    startV: "0"
    #填写图片的真实像素宽度
    endU: "84"
    #填写图片的真实像素高度
    endV: "5"
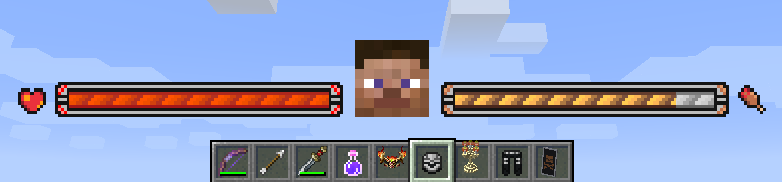
那我们如何使它从左向右动起来呢?我们在player_state.yml的options里添加如下的openDos配置
这里我们以AttributePlus属性插件的血量作为示例;%ap_life%为玩家当前血量、%ap_lifes%为玩家最大血量
    openDos:
      #刷新变量%ap_life%(AP插件的玩家当前血量变量)
      - "refreshPlaceholder`<->`ap_life"
      #刷新变量%ap_lifes%(AP插件的玩家最大血量变量)
      - "refreshPlaceholder`<->`ap_lifes"
      #更新player_state.yml内,名为heart的组件的width为w*0.135*%ap_life%/%ap_lifes%
      #即更新名为heart的组件的图片宽度为【满状态图片宽度*当前状态变量/满状态变量】
      - "update`<->`heart@width@w*0.135*%ap_life%/%ap_lifes%"
      #更新player_state.yml内,名为heart的组件的startU为84-84*%ap_life%/%ap_lifes%
      #即更新名为heart的组件的图片的左方读取开始界限为【图片的真实像素宽度-图片的真实像素宽度*当前状态变量/满状态变量】
      - "update`<->`heart@startU@84-84*%ap_life%/%ap_lifes%"
      #更新player_state.yml内,名为heart的组件的locationX为w*-0.168+(w*0.135-w*0.135/%ap_lifes%*%ap_life%)
      #即更新名为heart的组件的图片的X位置为【满状态图片X位置+(满状态图片宽度-满状态图片宽度*当前状态变量/满状态变量)】
      - "update`<->`heart@locationX@w*-0.168+(w*0.135-w*0.135*%ap_life%/%ap_lifes%)"
      #延迟100ms再向下执行
      - "delay`<->`100"
      #返回openDos的第一行
      - "goto`<->`1"
现在再进入游戏,血量条已经开始随着你的生命值的变化而从左向右变化了!!
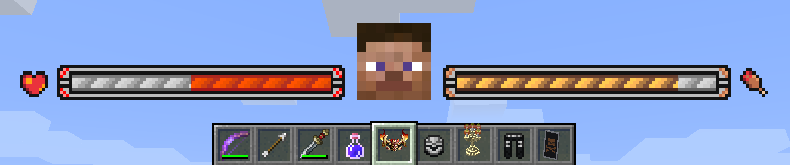
第五步,配置自上向下切割的状态条
这里我们以氧气条为例,配置一个自上向下切割的状态条,首先准备好图片,这里以oxygen.png为例
![]()
我们继续在player_state.yml里创建如下�配置
player_state:
  options:
    startX: "w*0.5"
    startY: "h"
    startZ: "0"
    openDos:
      - "refreshPlaceholder`<->`player_food_level"
      - "update`<->`hunger@width@w*0.135/20*%player_food_level%"
      - "update`<->`hunger@endU@84/20*%player_food_level%"
      - "refreshPlaceholder`<->`ap_life"
      - "refreshPlaceholder`<->`ap_lifes"
      - "update`<->`heart@width@w*0.135*%ap_life%/%ap_lifes%"
      - "update`<->`heart@startU@84-84*%ap_life%/%ap_lifes%"
      - "update`<->`heart@locationX@w*-0.168+(w*0.135-w*0.135*%ap_life%/%ap_lifes%)"
      - "delay`<->`100"
      - "goto`<->`1"
  background:
    type: texture
    path: 'local`<->`textures/gui/custom_bar.png'
    locationX: "-w*0.225"
    locationY: "-h*0.150"
    locationZ: "0"
    width: "w*0.45"
    height: "h*0.09"
  hunger:
    type: texture
    path: 'local`<->`textures/gui/hunger.png'
    locationX: "w*0.033"
    locationY: "-h*0.092"
    locationZ: "1"
    width: "w*0.135"
    height: "h*0.016"
    startU: "0"
    startV: "0"
    endU: "84"
    endV: "5"
  heart:
    type: texture
    path: 'local`<->`textures/gui/heart.png'
    locationX: "-w*0.168"
    locationY: "-h*0.092"
    locationZ: "1"
    width: "w*0.135"
    height: "h*0.016"
    startU: "0"
    startV: "0"
    endU: "84"
    endV: "5"
  #氧气条图片
  oxygen:
    type: texture
    path: 'local`<->`textures/gui/oxygen.png'
    locationX: "-w*0.020"
    locationY: "-h*0.144"
    locationZ: "1"
    width: "w*0.040"
    height: "h*0.077"
    #填写0即可
    startU: "0"
    #填写0即可
    startV: "0"
    #填写图片的真实像素宽度
    endU: "24"
    #填写图片的真实像素高度
    endV: "24"
那我们如何使它从上向下动起来呢?我们在player_state.yml的options里添加如下的openDos配置
原版氧气值变量是%player_air%,原版氧气值的最大值为固定值300
    openDos:
      #刷新变量%player_air%(原版氧气值变量)
      - "refreshPlaceholder`<->`player_air"
      #更新player_state.yml内,名为oxygen的组件的height为h*0.077*%player_air%/300
      #即更新名为oxygen的组件的图片高度为【满状态图片高度*当前状态变量/满状态变量】
      - "update`<->`oxygen@height@h*0.077*%player_air%/300"
      #更新player_state.yml内,名为oxygen的组件的startV为24-24*%player_air%/300
      #即更新名为oxygen的组件的图片的上方读取开始界限为【图片的真实像素高度-图片的真实像素高度*当前状态变量/满状态变量】
      - "update`<->`oxygen@startV@24-24*%player_air%/300"
      #更新player_state.yml内,名为oxygen的组件的locationY为h*-0.144+(h*0.077-h*0.077*%player_air%/300)
      #即更新名为oxygen的组件的图片的Y位置为【满状态图片Y位置+(满状态图片高度-满状态图片高度*当前状态变量/满状态变量)】
      - "update`<->`oxygen@locationY@h*-0.144+(h*0.077-h*0.077*%player_air%/300)"
      #延迟100ms再向下执行
      - "delay`<->`100"
      #返回openDos的第一行
      - "goto`<->`1"
现在再进入游戏,氧气条已经开始随着你的氧气值的变化而从上向下变化了!!
Tips:那我们如何使它在玩家不在水里时自动隐藏全满的氧气条呢?我们在player_state.yml的oxygen里添加如下的enable配置
  #氧气条图片
  oxygen:
    enable: exist(%player_inWater%,true)
    type: texture
    path: 'local`<->`textures/gui/oxygen.png'
    locationX: "-w*0.020"
    locationY: "-h*0.144"
    locationZ: "1"
    width: "w*0.040"
    height: "h*0.077"
    startU: "0"
    startV: "0"
    endU: "24"
    endV: "24"
自定义玩家状态HUD-脚本版演示教程
这里是更为高阶的用法,需要具有一定的基础,使用客户端脚本以更好的性能来实现功能
示例配置文件
点击查看完整的示例配置
script_player_state:
  options:
    startX: "w*0.5"
    startY: "h"
    startZ: "0"
    script:
      tickScript: |
        var delayConunt = tickCount % 2 ;
        if(delayConunt != 0){
          return 0;
        }
        var food = PAPI.request("%player_food_level%");
        var max_food = "20";
        var hunger_texture = GuiScreen.getGuiPart("hunger");
        hunger_texture.setWidth("130*" + food + "/" + max_food);
        hunger_texture.setEndU("84*" + food + "/" + max_food);
        var health = PAPI.request("%player_health%");
        var max_health = PAPI.request("%player_max_health%");
        var heart_texture = GuiScreen.getGuiPart("heart");
        heart_texture.setWidth("130*" + health + "/" + max_health);
        heart_texture.setStartU("84-84*" + health + "/" + max_health);
        heart_texture.setLocationX("-161+(130-130*" + health + "/" + max_health + ")");
        var oxygen_texture = GuiScreen.getGuiPart("oxygen");
        if(PAPI.request("%player_inWater%").equals("true")){
          oxygen_texture.setEnable(true);
          var air = PAPI.request("%player_air%");
          var max_air = "300";
          oxygen_texture.setHeight("39*" + air + "/" + max_air);
          oxygen_texture.setStartV("24-24*" + air + "/" + max_air);
          oxygen_texture.setLocationY("-72+(39-39*" + air + "/" + max_air + ")");
        }else{
          oxygen_texture.setEnable(false);
        }
  background:
    type: texture
    path: 'local`<->`textures/gui/custom_bar.png'
    locationX: "-216"
    locationY: "-75"
    locationZ: "0"
    width: "432"
    height: "45"
    startV: "0"
  hunger:
    type: texture
    path: 'local`<->`textures/gui/hunger.png'
    locationX: "32"
    locationY: "-46"
    locationZ: "1"
    width: "130"
    height: "8"
    startU: "0"
    startV: "0"
    endU: "84"
    endV: "5"
  heart:
    type: texture
    path: 'local`<->`textures/gui/heart.png'
    locationX: "-161"
    locationY: "-46"
    locationZ: "1"
    width: "130"
    height: "8"
    startU: "0"
    startV: "0"
    endU: "84"
    endV: "5"
  oxygen:
    type: texture
    path: 'local`<->`textures/gui/oxygen.png'
    locationX: "-19"
    locationY: "-72"
    locationZ: "1"
    width: "38"
    height: "39"
    startU: "0"
    startV: "0"
    endU: "24"
    endV: "24"
第一步,关闭原版状态条
在原版游戏中,游戏提供了显示玩家的生命、饥饿和经验条等等的状态的原版状态条,你需要将其关闭,在进行自定义更改。
在配置Config.yml中有如下内容,改写为true即可
  #关于游戏内HUD的参数设置
  HUD:
    # 取消显示原版的血量条
    disableHealth: true
    # 取消显示原版的经验条
    disableExperience: true
    # 取消显示原版的饥饿条
    disableFood: true
    # 取消显示原版的快捷栏
    disableQuick: true
    # 取消显示原版的盔甲栏
    disableArmor: true
    # 取消显示原版的骑马跳跃条
    disableJump: true
    # 取消显示原版的TAB列表
    disableTab: true
    # 取消显示原版的聊天框
    disableChat: true
    # 取消显示原版的药水显示
    disablePotion: true
    # 取消显示原版的水下氧气显示
    disableAir: true
    # 取消显示原版的骑马时马的血量
    disableHealthMount: true
第二步,配置自定义玩家状态HUD的背景图片
首先,制作好合适的背景图片,这里以![]() 为例
为例
我们在plugins/GermPlugin/gui文件夹内创建一个yml文件,这里以player_state.yml为例
script_player_state:
  options:
    startX: "w*0.5"
    startY: "h"
    startZ: "0"
  #HUD的背景图片
  background:
    type: texture
    path: 'local`<->`textures/gui/custom_bar.png'
    locationX: "-216"
    locationY: "-75"
    locationZ: "0"
    width: "432"
    height: "45"
    startV: "0"
接下来,我们在Config.yml里进行如下配置,然后再次进入游戏即可
#在玩家加入服务器时,赋予玩家这些HUD
PermanentHud:
  - "script_player_state"
第三步,配置自右向左切割的状态条
这里我们以饥饿条为例,配置一个自右向左切割的状态条,首先准备好图片,这里以hunger.png为例
![]()
我们在player_state.yml里创建如下配置
script_player_state:
  options:
    startX: "w*0.5"
    startY: "h"
    startZ: "0"
  background:
    type: texture
    path: 'local`<->`textures/gui/custom_bar.png'
    locationX: "-216"
    locationY: "-75"
    locationZ: "0"
    width: "432"
    height: "45"
    startV: "0"
  #饥饿条图片
  hunger:
    type: texture
    path: 'local`<->`textures/gui/hunger.png'
    locationX: "32"
    locationY: "-46"
    locationZ: "1"
    width: "130"
    height: "8"
    #填写0即可
    startU: "0"
    #填写0即可
    startV: "0"
    #填写图片的真实像素宽度
    endU: "84"
    #填写图片的真实像素高度
    endV: "5"
那我们如何使它从右向左动起来呢?我们在player_state.yml的options里添加如下的script.tickScript配置
原版饱食度变量是%player_food_level%,原版饱食度的最大值为固定值20
  script:
    tickScript: |
      // 对tickCount按2取余,这样就能结合判断做到每2tick执行一次运行逻辑
      var delayConunt = tickCount % 2 ;
      if(delayConunt != 0){
        return 0;
      }
      // 以下为饥饿条运行逻辑
      // 获取%player_food_level%占位符的解析值(String)
      var food = PAPI.request("%player_food_level%");
      var max_food = "20";
      // 获取当前界面内名为hunger的组件
      var hunger_texture = GuiScreen.getGuiPart("hunger");
      // 设置hunger组件的width为 "130*"+food+"/"+max_food
      // 即更新名为hunger的组件的图片宽度为【满状态图片宽度*当前状态值/满状态值】
      hunger_texture.setWidth("130*" + food + "/" + max_food);
      // 设置hunger组件的endU为 "84*"+food+"/"+max_food
      // 即更新名为hunger的组件的图片的右方截取界限为【图片的真实像素宽度*当前状态值/满状态值】
      hunger_texture.setEndU("84*" + food + "/" + max_food);
现在再进入游戏,饥饿条已经开始随着你的饥饿度的变化而从右向左变化了!!
第四步,配置自左向右切割的状态条
这里我们以生命条为例,配置一个自左向右切割的状态条,首先准备好图片,这里以heart.png为例
![]()
我们继续在player_state.yml里创建如下配置
script_player_state:
  options:
    startX: "w*0.5"
    startY: "h"
    startZ: "0"
    script:
      tickScript: |
        var delayConunt = tickCount % 2;
        if(delayConunt != 0){
          return 0;
        }
        var food = PAPI.request("%player_food_level%");
        var max_food = "20";
        var hunger_texture = GuiScreen.getGuiPart("hunger");
        hunger_texture.setWidth("130*" + food + "/" + max_food);
        hunger_texture.setEndU("84*" + food + "/" + max_food);
  background:
    type: texture
    path: 'local`<->`textures/gui/custom_bar.png'
    locationX: "-216"
    locationY: "-75"
    locationZ: "0"
    width: "432"
    height: "45"
    startV: "0"
  hunger:
    type: texture
    path: 'local`<->`textures/gui/hunger.png'
    locationX: "32"
    locationY: "-46"
    locationZ: "1"
    width: "130"
    height: "8"
    startU: "0"
    startV: "0"
    endU: "84"
    endV: "5"
  #生命条图片
  heart:
    type: texture
    path: 'local`<->`textures/gui/heart.png'
    locationX: "-161"
    locationY: "-46"
    locationZ: "1"
    width: "130"
    height: "8"
    #填写0即可
    startU: "0"
    #填写0即可
    startV: "0"
    #填写图片的真实像素宽度
    endU: "84"
    #填写图片的真实像素高度
    endV: "5"
那我们如何使它从左向右动起来呢?我们在player_state.yml的options里添加如下的script.tickScript配置
    script:
      #tick执行 一秒20次
      tickScript: |
        var delayConunt = tickCount % 2 ;
        if(delayConunt != 0){
          return 0;
        }
        var food = PAPI.request("%player_food_level%");
        var max_food = "20";
        var hunger_texture = GuiScreen.getGuiPart("hunger");
        hunger_texture.setWidth("130*" + food + "/" + max_food);
        hunger_texture.setEndU("84*" + food + "/" + max_food);
        //以下为生命条运行逻辑
        // 获取%player_health%占位符的解析值(String)
        var health = PAPI.request("%player_health%");
        // 获取%player_max_health%占位符的解析值(String)
        var max_health = PAPI.request("%player_max_health%");
        // 获取当前界面内名为heart的组件
        var heart_texture = GuiScreen.getGuiPart("heart");
        // 设置heart组件的width为 "130*"+health+"/"+max_health
        // 即设置名为heart的组件的图片宽度为【满状态图片宽度*当前状态值/满状态值】
        heart_texture.setWidth("130*" + health + "/" + max_health);
        // 设置heart组件的startU为 "84-84*"+health+"/"+max_health
        // 即设置名为heart的组件的图片的左方读取开始界限为【图片的真实像素宽度-图片的真实像素宽度*当前状态值/满状态值】
        heart_texture.setStartU("84-84*" + health + "/" + max_health);
        // 设置heart组件的locationX为 "-161+(130-130*"+health+"/"+max_health+")"
        // 即设置名为heart的组件的图片的X位置为【满状态图片X位置+(满状态图片宽度-满状态图片宽度*当前状态值/满状态值)】
        heart_texture.setLocationX("-161+(130-130*" + health + "/" + max_health + ")");
现在再进入游戏,生命条已经开始随着你的生命值的变化而从左向右变化了!��!
第五步,配置自上向下切割的状态条
这里我们以氧气条为例,配置一个自上向下切割的状态条,首先准备好图片,这里以oxygen.png为例
![]()
我们继续在player_state.yml里创建如下配置
script_player_state:
  options:
    startX: "w*0.5"
    startY: "h"
    startZ: "0"
    script:
      tickScript: |
        var delayConunt = tickCount % 2 ;
        if(delayConunt != 0){
          return 0;
        }
        var food = PAPI.request("%player_food_level%");
        var max_food = "20";
        var hunger_texture = GuiScreen.getGuiPart("hunger");
        hunger_texture.setWidth("130*" + food + "/" + max_food);
        hunger_texture.setEndU("84*" + food + "/" + max_food);
        var health = PAPI.request("%player_health%");
        var max_health = PAPI.request("%player_max_health%");
        var heart_texture = GuiScreen.getGuiPart("heart");
        heart_texture.setWidth("130*" + health + "/" + max_health);
        heart_texture.setStartU("84-84*" + health + "/" + max_health);
        heart_texture.setLocationX("-161+(130-130*" + health + "/" + max_health + ")");
  background:
    type: texture
    path: 'local`<->`textures/gui/custom_bar.png'
    locationX: "-216"
    locationY: "-75"
    locationZ: "0"
    width: "432"
    height: "45"
    startV: "0"
  hunger:
    type: texture
    path: 'local`<->`textures/gui/hunger.png'
    locationX: "32"
    locationY: "-46"
    locationZ: "1"
    width: "130"
    height: "8"
    startU: "0"
    startV: "0"
    endU: "84"
    endV: "5"
  heart:
    type: texture
    path: 'local`<->`textures/gui/heart.png'
    locationX: "-161"
    locationY: "-46"
    locationZ: "1"
    width: "130"
    height: "8"
    startU: "0"
    startV: "0"
    endU: "84"
    endV: "5"
  #氧气条图片
  oxygen:
    type: texture
    path: 'local`<->`textures/gui/oxygen.png'
    locationX: "-19"
    locationY: "-72"
    locationZ: "1"
    width: "38"
    height: "38"
    #填写0即可
    startU: "0"
    #填写0即可
    startV: "0"
    #填写图片的真实像素宽度
    endU: "24"
    #填写图片的真实像素高度
    endV: "24"
那我们如何使它从上向下动起来呢?我们在player_state.yml的options里添加如下的script.tickScript配置
原版氧气值变量是%player_air%,原版氧气值的最大值为固定值300
    script:
      #tick执行 一秒20次
      tickScript: |
        var delayConunt = tickCount % 2 ;
        if(delayConunt != 0){
          return 0;
        }
        var food = PAPI.request("%player_food_level%");
        var hunger_texture = GuiScreen.getGuiPart("hunger");
        hunger_texture.setWidth("130*" + food + "/20");
        hunger_texture.setEndU("84*" + food + "/20")
        var health = PAPI.request("%player_health%");
        var max_health = PAPI.request("%player_max_health%");
        var heart_texture = GuiScreen.getGuiPart("heart");
        heart_texture.setWidth("130*" + health + "/" + max_health);
        heart_texture.setStartU("84-84*" + health + "/" + max_health);
        heart_texture.setLocationX("-161+(130-130*" + health + "/" + max_health + ")");
        //以下为氧气条运行逻辑
        // 获取当前界面内名为oxygen的组件
        var oxygen_texture = GuiScreen.getGuiPart("oxygen");
        // 如果%player_inWater%客户端变量的值为"true"才执行{}内脚本
        // 即实现在水中才显示氧气条
        if(PAPI.request("%player_inWater%").equals("true")){
          oxygen_texture.setEnable(true);
          // 获取%player_air%占位符的解析值(String)
          var air = PAPI.request("%player_air%");
          var max_air = "300";
          // 设置oxygen组件的height为 "39*"+air+"/"+max_air
          // 即设置名为oxygen的组件的图片高度为【满状态图片高度*当前状态值/满状态值】
          oxygen_texture.setHeight("39*" + air + "/" + max_air);
          // 设置oxygen组件的startV为 "24-24*"+air+"/"+max_air
          // 即设置名为oxygen的组件的图片的上方读取开始界限为【图片的真实像素高度-图片的真实像素高度*当前状态值/满状态值】
          oxygen_texture.setStartV("24-24*" + air + "/" + max_air);
          // 设置oxygen组件的locationY为 "-72+(39-39*"+air+"/"+max_air+")"
          // 即设置名为oxygen的组件的图片的Y位置为【满状态图片Y位置+(满状态图片高度-满状态图片高度*当前状态值/满状态值)】
          oxygen_texture.setLocationY("-72+(39-39*" + air + "/" + max_air + ")");
        } else {
          oxygen_texture.setEnable(false);
        }
现在再进入游戏,进入水中,氧气条已经开始随着你的氧气值的变化而从上向下变化了!!
额外的教程
在刚刚的教程中,为了方便大家对照Dos版理解,我们为组件设置属性时设置的均为字符串(String),但是为了更好的性能,其实我们可以像下面示例一样,将占位符提前转换为数值,在脚本中计算出准确值然后直接设置给组件。
点击查看完整的示例配置
 script_player_state:
  options:
    startX: "w*0.5"
    startY: "h"
    startZ: "0"
    #可在界面中嵌入文本 但是无法使用补全
    script:
      #tick执行 一秒20次
      tickScript: |
        var delay = tickCount % 2;
        if(delay != 0){
          return 0;
        }
        var food = double(PAPI.request("%player_food_level%"));
        var max_food = 20;
        var food_rate = food / max_food;
        var hunger_texture = GuiScreen.getGuiPart("hunger");
        hunger_texture.setWidth(130*food_rate);
        hunger_texture.setEndU(84*food_rate);
        var health = double(PAPI.request("%player_health%"));
        var max_health = double(PAPI.request("%player_max_health%"));
        var health_rate = health / max_health;
        var heart_texture = GuiScreen.getGuiPart("heart");
        heart_texture.setWidth(130*health_rate);
        heart_texture.setStartU(84-84*health_rate);
        heart_texture.setLocationX(-161+(130-130*health_rate));
        var oxygen_texture = GuiScreen.getGuiPart("oxygen");
        if(PAPI.request("%player_inWater%").equals("true")){
          var air = double(PAPI.request("%player_air%"));
          var max_air = 300;
          var air_rate = air / max_air;
          oxygen_texture.setHeight( 39*air_rate );
          oxygen_texture.setStartV( 24-24*air_rate );
          oxygen_texture.setLocationY( -72+(39-39*air_rate) );
          oxygen_texture.setEnable(true);
        }else{
          oxygen_texture.setEnable(false);
        }

  background:
    type: texture
    path: 'local`<->`textures/gui/custom_bar.png'
    locationX: "-216"
    locationY: "-75"
    locationZ: "0"
    width: "432"
    height: "45"
    startV: "0"
  hunger:
    type: texture
    path: 'local`<->`textures/gui/hunger.png'
    locationX: "32"
    locationY: "-46"
    locationZ: "1"
    width: "130"
    height: "8"
    startU: "0"
    startV: "0"
    endU: "84"
    endV: "5"
  heart:
    type: texture
    path: 'local`<->`textures/gui/heart.png'
    locationX: "-161"
    locationY: "-46"
    locationZ: "1"
    width: "130"
    height: "8"
    startU: "0"
    startV: "0"
    endU: "84"
    endV: "5"
  oxygen:
    type: texture
    path: 'local`<->`textures/gui/oxygen.png'
    locationX: "-19"
    locationY: "-72"
    locationZ: "1"
    width: "38"
    height: "39"
    startU: "0"
    startV: "0"
    endU: "24"
    endV: "24"